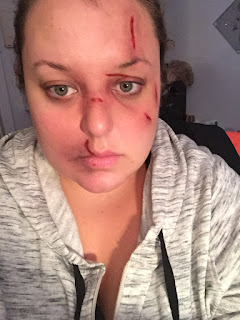
Halloween Injuries
With Halloween right around the corner, I wanted to get a few more ideas that anyone can use for fun! This one is going to be the quickest and easiest! Any Halloween store or drug store will have these products and there is a good chance they will be on sale since it is so close. You can use any primer to prime your face before putting the face paints on there, but I used Maybelline's Baby Skin Instant Pore Eraser. It helps for the paints to not stain the skin as much and for everything to stay in place, too.
I purchase this set of paints at Spirit Halloween Store in my neck of the woods. They are called the Injury Stack Makeup with 5 cream pods to create bruises and cuts. The pods include a mustard yellow, deep red, bright red, maroon, and black. In the picture I had my flash on and the colors look a little different, but you can see on our faces how they perform. I started out by using the maroon color to map out where I wanted the deepest bruises to be, like around my eyes as if I got hit in the nose, and cuts on my forehead, cheek, lip, and nose. The maroon outlined the area and I went back in with the mustard yellow to show healing areas of the bruises. Below is a picture of Nick when I was mapping out his face with the maroon. I used a mixture of the two reds to show actual cuts and deepened the bruising around them with the maroon and black.
When I did the same makeup on Nick I ended up using a little bit of fake blood, too. Again, I just bought the cheaper fake blood gel at Spirit, but I have seen it in CVS and Walgreens. Using a small Elf foundation brush, I pushed the fake blood into the areas I created cuts on Nick's face to show more of a dried blood look. You can use any type of small paint brush, eye liner brush, or brow brush to paint on fake blood.
This is all about blending! Using these colors and blending them in the injured areas makes for a fairly realistic look. You can use brushes and sponges; it is really all about being creative with what you have on this one. Although you should be blending out the colors, it is ok to be messy and remember that real cuts and bruises are never perfect! Nick and I both scared a few people with these pictures, but no worries, it is all makeup!
Thanks for reading! I hope you all enjoyed this easy and cheap Halloween idea! Let me know what you think or if you do something like it!!


Comments
Post a Comment